
Direct Summary (Quick Answer)
Measuring window and door screens accurately requires recording dimensions to the nearest 1/16 inch using a reliable, rigid measuring tool. When duplicating an existing undamaged screen, measure the outside edge-to-edge frame dimensions (shortest side, longest side, and profile thickness). When the original screen is missing, inspect the receiving channels to identify the retention hardware style: where top tension leaf springs in a deep upper channel are used, documented manufacturer field guidance (Metro Screenworks) recommends measuring from the inside of the deepest top channel down to the opposite sill channel and deducting approximately 1/8 inch from height for spring compression and installation clearance. For sliding patio screen doors, track-to-track measurements follow manufacturer-specific height workflows (such as measuring track-to-track and adding 1/8 inch, or measuring 1/4 inch into the upper U-channel) before fine-tuning via bottom roller adjustment screws.
Practical Principles of Accurate Screen Sizing
How to Approach Screen Measuring and Sizing Guidelines
To maintain strict factual accuracy, measurement instructions across this guide are distinguished into five specific tiers of authority:
- Manufacturer Specifications: Published measuring workflows, track-to-track addition rules, and roller adjustment instructions documented by specific screen fabricators and hardware suppliers, including Metro Screenworks and C.R. Laurence.Manufacturer Specification
- Common Trade Practices: Widely documented field techniques used across screen and window replacement, such as measuring to the nearest 1/16 inch.Common Trade Practice
- Variable by Window System: Channel deductions, hardware placement, and frame clearances that legitimately depend on the original window manufacturer's track depth, sill profile, or extrusion die.Variable by System / Environment
- Geometric Principles: Standard mathematical methods, such as diagonal corner-to-corner measurement, used to verify rectangular squareness.Geometric Principle
- Commercial Availability: Catalog evidence that a frame profile, hardware type, or component exists commercially, without implying it fits every opening.Commercial Availability
Because screen frame channels provide relatively shallow seating pockets, small dimensional errors can affect fit, causing a screen to bind during installation or seat loosely in the receiving track.
- Use a Rigid Measuring Tool: Flexible measuring tapes can stretch or bend, leading to inconsistent readings. Use a rigid steel tape measure or caliper capable of reliably reading fractional increments.Common Trade Practice
- Measure Dimensions to the Nearest 1/16 Inch: Manufacturer field guides such as Metro Screenworks direct measuring all replacement screen dimensions to the nearest 1/16 inch rather than rounding to the nearest half-inch or full inch.Common Trade Practice
- Check Frame Profile Depth: Commercially available replacement profiles commonly measure nominal 5/16 inch, 3/8 inch, or 7/16 inch deep. Exact compatibility still depends on the receiving channel and frame system.Commercial Availability
- Take Multi-Point Measurements to Check for Bowing: A recommended field verification technique is to check width across the top, center, and bottom, and height across the left, center, and right. Recording the narrowest consistent dimension helps prevent binding against localized frame distortion; this is field verification guidance, not an industry consensus standard.Variable by System / Environment
- Identify Hardware Type Before Applying Any Deduction: Sizing deductions and clearances depend on the screen-retention system, channel depth, sill profile, and hardware configuration.Variable by System / Environment
When the existing assembly is being rescreened, document the screen mesh fabric wrapped around the frame because mesh thickness can affect spline fit and installation pressure.
Scenario 1: Measuring an Existing, Undamaged Screen Frame
If the original window screen fits properly and is not bent, twisted, or distorted, measuring its physical frame is the most direct method for ordering a replacement.
- Measure Outside Frame Dimensions: Measure overall width from the outside edge of the left frame rail to the outside edge of the right frame rail. Measure overall height from top edge to bottom edge. Measure the aluminum frame itself, excluding flexible pull tabs or uncompressed wire springs extending past the frame perimeter.Common Trade Practice
- Measure Frame Depth: Measure the outside cross-sectional thickness of the aluminum frame rail. Commercially available replacement profiles commonly measure nominal 5/16 inch, 3/8 inch, or 7/16 inch deep.Commercial Availability
- Document Hardware Placement: Record which rails hold hardware, for example tension springs along the top rail, pull tabs along the bottom rail, or plunger pins through side rails.Variable by System / Environment
Scenario 2: Measuring When the Original Window Screen is Missing
When the original screen is missing, you must measure the window frame's dedicated receiving channels directly.
The Channel-to-Channel Measurement Workflow
- Inspect Receiving Channel Geometry First: Examine the window frame perimeter to identify the dedicated screen channel profile, stop depths, and intended retention style. Do not assume every window uses the same hardware arrangement.Variable by System / Environment
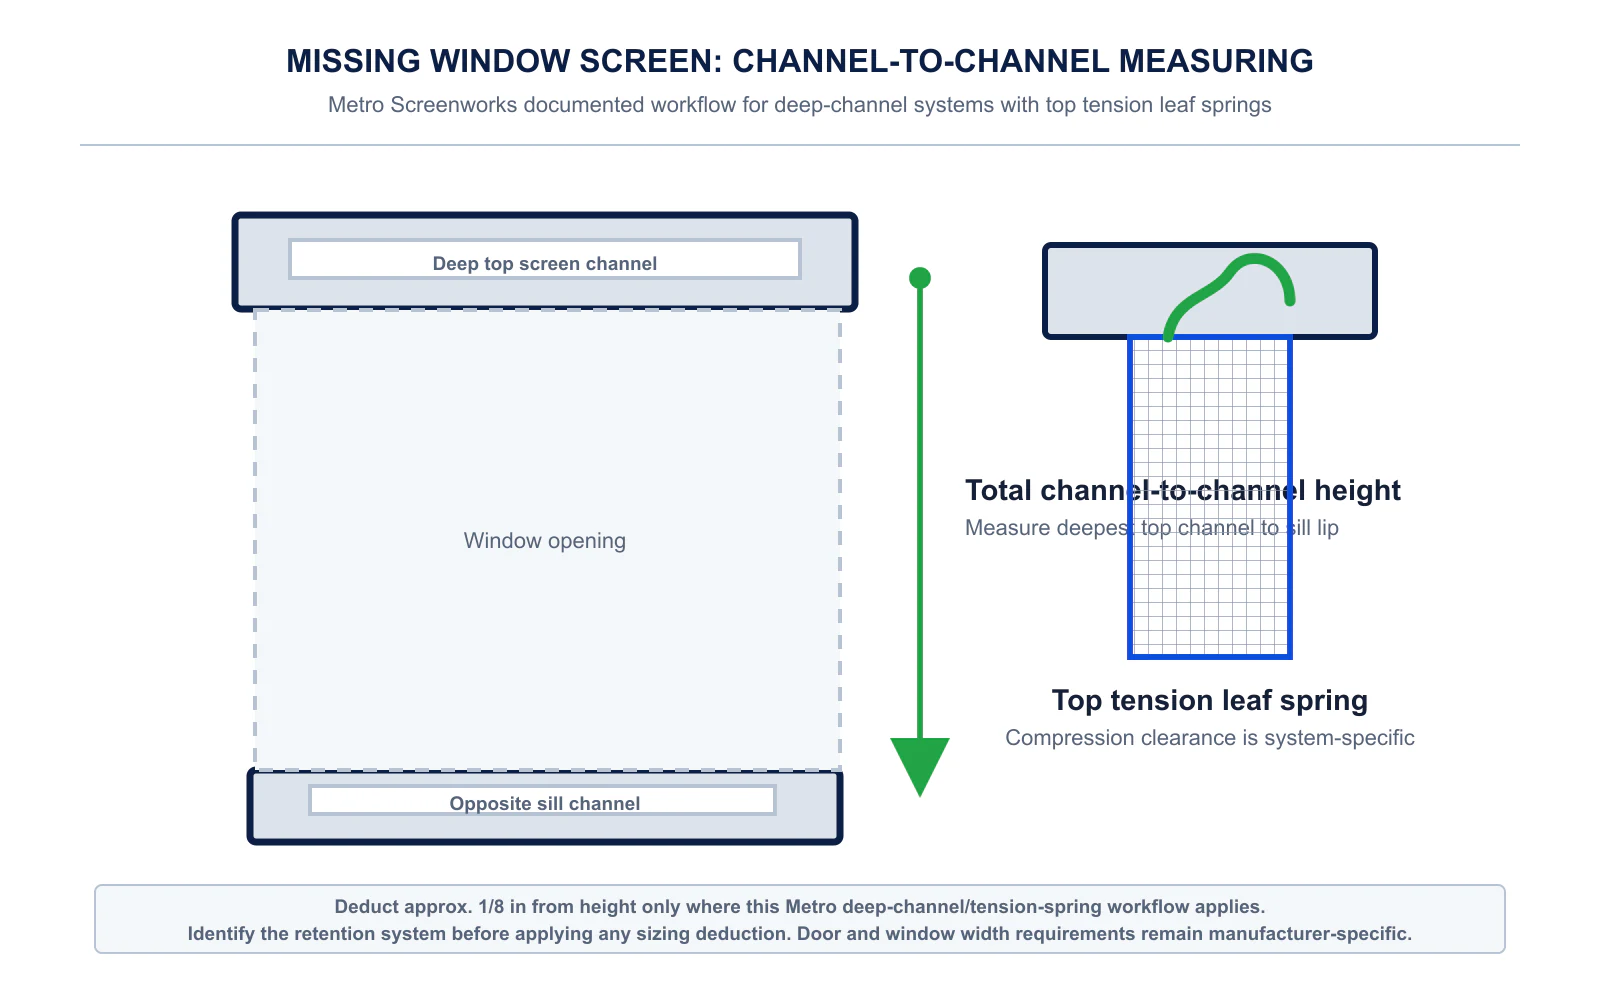
- Identify Deep Channel Configurations: In window systems configured with a deeper top channel receiving tension leaf springs, locate the deep track on the top rail or side jamb.Variable by System / Environment
- Measure Total Channel Depth: Where this tension spring configuration applies, Metro Screenworks field guidance says to measure from the inside bottom of the deepest top channel down to the lip of the opposite sill channel.Manufacturer Specification
- Apply Sizing Deduction: Metro Screenworks field guidance documents deducting approximately 1/8 inch from the total channel-to-channel height. This clearance allows the screen to compress the tension springs upward into the deep track, providing clearance for the bottom rail to swing over the sill into the lower channel.Manufacturer Specification
- Measure Width: Measure the clear distance between the left and right receiving channels. Finished width requirements depend on the receiving channel profile, frame style, and specific window manufacturer geometry.Variable by System / Environment
Understanding Retention Hardware & Sizing Deductions
Sizing deductions and clearances depend directly on the mechanical retention hardware used by the specific window system.
Before changing frame dimensions, identify the frame geometry, hardware position, mesh thickness, and spline system. The related guides on box frames vs. lip screen frame profiles and the spline selection guide and spline groove width are useful context when the measurement problem crosses into frame or spline compatibility.
- Tension Leaf Springs: Installed on the top rail or side rail of box frames. Where this hardware configuration is used in deep-channel window systems, published field guidance from Metro Screenworks recommends deducting approximately 1/8 inch from total opening height for spring clearance.Manufacturer Specification
- Spring Plunger Pins: Metal or plastic pins mounted through drilled holes in the screen frame that extend into pre-drilled holes in the window casing. Clearances and pin hole centerlines are determined by the specific window casing geometry and must align with the receiving holes in the window stops.Variable by System / Environment
- Knife Latches, Turn Buttons & Friction Fits: Common on interior casement screens or specialty storm framing. Finished dimensions and hardware locations depend on the manufacturer's stop-to-stop casing dimensions.Variable by System / Environment
Scenario 3: Measuring for Sliding Patio Screen Doors
Sliding patio screen doors operate on dedicated track systems with an upper U-channel header and a raised bottom guide rail.
Height Measuring Methods (Metro Screenworks Documented Workflows)
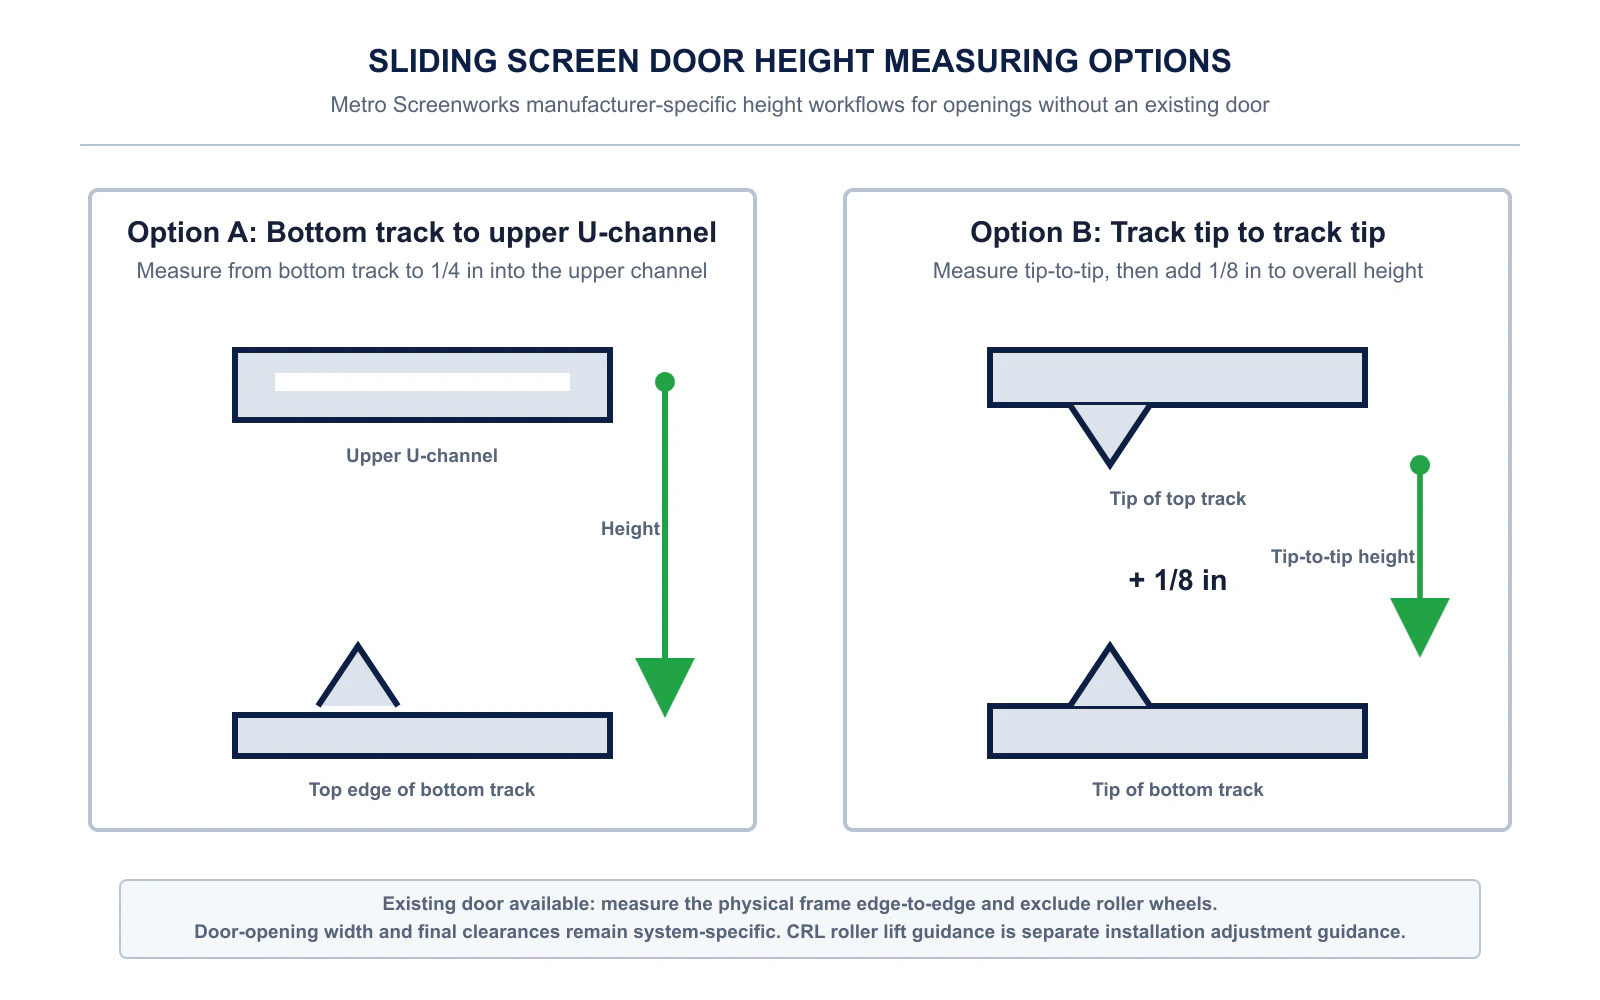
When measuring for a replacement sliding screen door without an existing door, documented manufacturer methods include:
- Option A (Track to U-Channel): Measure from the top edge of the bottom track up 1/4 inch into the upper U-channel.Manufacturer Specification
- Option B (Track to Track): Measure from the tip of the bottom track to the tip of the top track, then add 1/8 inch to the overall measurement.Manufacturer Specification
- If an Existing Door is Available: Measure the overall frame height from top edge to bottom edge, excluding the roller wheels.Manufacturer Specification
Door Width Measurement (System-Specific / Manufacturer Guidance)
When measuring an existing door, measure the overall frame width directly across the rails, excluding rollers. When measuring a door opening without an existing unit, width measurement depends on the patio door system and receiving jamb profile; verify manufacturer ordering instructions for the specific door model.Variable by System / Environment
Roller Adjustment & Leveling (C.R. Laurence Instructions)
Sliding screen doors incorporate adjustable roller assemblies at the bottom corners. Installation instructions from manufacturers such as C.R. Laurence direct installers to turn the roller adjustment screws so the rollers lift the door off the track by approximately 1/8 inch (3 mm), adjusting each corner until the lead stile is parallel with the door jamb for smooth travel.Manufacturer Specification
Scenario 4: Measuring Casement and Awning Interior Screens
Because casement and awning windows crank outward toward the exterior, screens are mounted on the room interior.
- Measure Interior Stops: Measure the clear distance between the interior casing stops, including width and height across the opening.Variable by System / Environment
- Verify Hardware & Operator Clearance: Check that the screen frame profile thickness does not interfere with folding window hand cranks, locking levers, or operator mechanisms.Variable by System / Environment
- Wicket Door Placement: If the window uses a rigid, non-folding crank or push-out operator, document the hand-crank location so a hinged wicket access door can be positioned accurately along the bottom rail.Variable by System / Environment
Field Diagnostics: Verifying Opening Squareness
A screen fabricated to true rectangular dimensions may bind if the receiving window opening is out-of-square.
The Diagonal Verification Check (Geometric Principle)
Measure diagonally from the top-left corner (Corner A) to the bottom-right corner (Corner C), then from the top-right corner (Corner B) to the bottom-left corner (Corner D).Geometric Principle
In geometric principle, a rectangular frame is square when its two diagonal measurements are equal. The closer the two diagonal measurements are to one another, the closer the opening or assembled frame is to true rectangular squareness.Geometric Principle
If diagonal measurements differ noticeably, the window opening has settled or racked. Acceptable dimensional tolerance depends on the specific frame profile, receiving channel depth, and window manufacturer system.Variable by System / Environment
Master Field Measurement Reference Table
The table below compiles documented measuring workflows, hardware configurations, and representative sizing guidelines across window and door types.
| Opening / Screen Type | Measurement Location | Hardware Configuration | Documented Sizing Guideline | Source / Authority | Classification |
|---|---|---|---|---|---|
| Single-Hung (Existing Screen) | Edge-to-edge outside frame | Top tension leaf springs | Measure exact height, width, and frame depth | Metro Screenworks Field Guide | COMMON TRADE PRACTICE |
| Single-Hung (Missing Screen) | Deep top channel to bottom sill | Top tension leaf springs | Measure channel depth, deduct approximately 1/8 inch from height | Metro Screenworks Field Guide | MANUFACTURER SPECIFICATION (Documented guideline) |
| Horizontal Slider (Missing Screen) | Deep side/top channel to sill | Tension springs / pull tabs | Deduct approximately 1/8 inch along spring axis where applicable | Metro Screenworks Field Guide | MANUFACTURER SPECIFICATION (Documented guideline) |
| Wood-Clad / Plunger Pin Frame | Stop-to-stop opening | Spring plunger pins | Sizing and pin hole locations depend on casing | Window System Geometry | VARIABLE BY SYSTEM |
| Sliding Screen Door (Option A) | Bottom track to 1/4 inch into top channel | Adjustable corner rollers | Measure bottom track to 1/4 inch inside top channel | Metro Screenworks Field Guide | MANUFACTURER SPECIFICATION |
| Sliding Screen Door (Option B) | Tip of bottom track to tip of top | Adjustable corner rollers | Measure tip-to-tip and add 1/8 inch to height | Metro Screenworks Field Guide | MANUFACTURER SPECIFICATION |
| Sliding Screen Door (Existing) | Edge-to-edge frame height | Adjustable corner rollers | Measure frame edge-to-edge; exclude rollers | Metro Screenworks Field Guide | MANUFACTURER SPECIFICATION |
| Sliding Screen Door Adjustment | Bottom corner roller screws | Ball-bearing roller assemblies | Adjust screw to lift door approximately 1/8 inch (3 mm) off track | C.R. Laurence KDDLX Instructions | MANUFACTURER SPECIFICATION |
| Casement Window (Interior) | Stop-to-stop clear opening | Knife latches / turn buttons | Measure clear opening; check operator clearance | Window System Geometry | VARIABLE BY SYSTEM |
Sizing deductions and track addition rules represent published manufacturer instructions from Metro Screenworks and C.R. Laurence. Always inspect existing window frame channels to verify track geometry before ordering custom screens.
Frequently Asked Questions (AEO Direct Answers)
How do I measure a window for a replacement screen if the old screen is missing?
Inspect the window frame channels to determine the retention style. In window systems configured with a deep top channel and tension leaf springs, documented manufacturer field guidance such as Metro Screenworks recommends measuring from the inside of the deepest top channel down to the lip of the opposite sill channel and deducting approximately 1/8 inch from this height for spring compression and installation clearance.
How do I measure for a sliding patio screen door?
If an existing screen door is available, measure its overall frame height and width directly, excluding the roller wheels. When measuring a door opening without an existing door, documented manufacturer methods from Metro Screenworks include measuring from the top of the bottom track up 1/4 inch into the upper U-channel, or measuring track-to-track tip to tip and adding 1/8 inch to the overall height.
Why is measuring to the nearest 1/16 inch recommended for window screens?
Window screen retention channels provide relatively shallow seating pockets. Measuring to the nearest 1/16 inch helps ensure the replacement frame clears the opening during installation while maintaining sufficient perimeter overlap inside the receiving tracks.
How do I adjust the rollers on a sliding screen door after installation?
According to manufacturer installation instructions such as C.R. Laurence, locate the adjustment screws on the lower corners of the screen door. Turn the screws to adjust the roller wheels, lifting the door approximately 1/8 inch (3 mm) off the bottom track and leveling the door stile parallel with the jamb for smooth travel.
How do I check if a window opening is square before ordering a screen?
Measure diagonally from the top-left corner to the bottom-right corner, then from the top-right corner to the bottom-left corner. By geometric principle, a rectangular frame is square when its two diagonal measurements are equal; the closer the two diagonal measurements are to one another, the closer the opening is to true rectangular squareness.
Technical References & Standards Reviewed
The measurement protocols and sizing guidelines in this guide are verified against the following primary manufacturer documentation and technical instructions:
- Metro ScreenworksWhen Ordering Your Window Screen & How to Measure Window Screens Guidelines
- Metro ScreenworksMeasure For A Screen Door Field Guide & Instructions
- C.R. Laurence Co., Inc. (CRL)CRL RIO KDDLX Series Sliding Screen Door Kit Installation Instructions
- C.R. Laurence Co., Inc. (CRL)Window Screen Frames, Hardware, and Rollers Technical Catalog
For Screen Professionals
ScreenOps helps screen companies manage customers, measurements, estimates, fabrication, field work, and operations.
Explore ScreenOps